Create EDI Documents Correctly All The Time
Forget the small details
From the simplest to the most complex, EDIDocument helps you create well-formed EDI documents the first time

Details
X12 EDI Data Structure
A general EDI document structure contains loops, segments, elements and composite elements. Loops contain segments, a segment contains elements and elements may contain other elements (composite elements). An example EDI document structure is:

EDIDocument mirrors this parent-child model when creating or loading EDI documents. EDIDocument contain Loop objects which in turn contain DataSegment objects which in turn can contain DataElement objects and so on. When generating documents EDIDocument navigates this parent-child hierarchy and visits each node in order to retrieve their data.
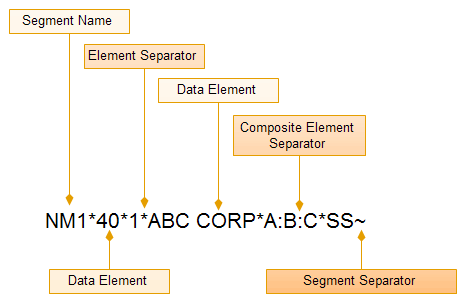
X12 EDI Segment Structure
EDIDocument uses the same terminology described in the Implementation Guides. This makes creating EDI data easier. For example, EDIDocument uses object names like DataSegment, DataElement, Loops, SegmentTerminatorCharacters etc.
Smart Feature: Padding and Trimming
All data elements have a minimum and maximum length. Violation of this constraint can lead to errors especially in fixed length segments like ISA. Failure to adhere to this length constraint may result in EDI validation failure and data rejection. The sender may have to regenerate the EDI document and resend it to the receiver wasting considerable time.
EDIDocument has to ability to pad or trim element data to reach minimum and maximum element length requirements. While generating EDI documents EDIDocument visits each node and checks the value to verify that they are within the minimum and maximum lengths. If data elements violate the length constraints, EDIDocument will either pad or trim the element in order the satisfy the constraints.
Smart Feature: Truncation of Empty Elements
When creating EDI documents certain elements may be missing or not available. In this case there is no data to be entered for those elements. Because each element must be delimited by the Element Terminator Character we will have a series of empty elements followed by a Segment Terminator Character. For example, if the Element Terminator Character is ‘*’ and the Segment Terminator Character is ‘~’ then we will have the following segment:
Empty element values in the middle of segments are not touched.
Delimiters
EDI documents contains a list of segments. Each segment is delimited by a special character called a Segment Terminator Character. Segments also contain elements. Each element is delimited by a special character called an Element Terminator Character. Some elements may contain other elements as well. These sub-elements are called composite elements. Composite elements are also delimited by a special character called a Composite Terminator Character. Every EDI document contains these special characters that are used to separate data into logical units.

Delimiters are set once and EDIDocument inserts them in their correctly places. By knowing what these special characters are EDIDocument can correctly create, validate and load EDI documents.
EDIDocument can also auto detect delimiters in EDI data
Auto Placement of Number of Segments, Transactions and Functional Headers
One of the bodies that govern some of the EDI specifications is ANSI X12. These EDI documents contain a segment, SE, used to specify the end of a header. According to the rules, this segment must contain the total amount of segments used within that specific header. EDIDocument will automatically keep a count of the number of segments used in the header and goes as far as to actually enter that data in the SE segment. This feature can also be turned off in cases where developers want to put other data in the SE segment. The property used to toggle this setting is AutoPlaceCorrectNumOfSegments. Additionally the number of ST transactions and GS Functional Groups are also tracked and added to the GE and IEA segments
Segment Separator String
EDI documents can quickly become cumbersome to look at visually. Some parsers may place a return character or a carriage return character so data can be more readable and appear on different lines. This is perfectly acceptable in the industry. Aside from placing a Segment Terminator Character at the end of each segment, an extra piece of formatting text can also be placed. This extra piece of formatting text is called the Segment Separator String. Developers who use this property can add their own formatting to their EDI documents.
Truncation of Empty Composite Elements for Smaller Files and Faster Processing
As with regular elements certain composite elements may be missing or not available. Because each composite element must be delimited by the Composite Element Terminator Character, if there is no data in one or more composite data element there will be a series of Composite Element Terminator Characters followed by an Element Terminator Character. For example, if the Element Terminator Character is ‘*’ and the Segment Terminator Character is ‘~’ and the Composite Element Terminator is ‘:’ then we will have the following segment:
Empty composite element values in the middle of segments are not touched.
Graphical Generation of EDI Tree Structure With Data
After generating new EDI documents EDIDocument has the ability to generate a graphical tree representation of it. The graphical tree contains the entire EDI document schema as well as element data. Users can click on the nodes to view and drill down into its contents. An example of the hierarchical tree is:

EDI File Generation Directly To Memory
The EDI document generation process often ends with a file being generated on the file system. It can then be retrieved and sent to an EDI receiver. This process, straight forward as it may seem, requires data to first be written to the file system only to be read in again. This simple delay can add up considerably when generating hundreds or even thousands of EDI files.
EDI Document has to ability to generate EDI data directly into memory. The data can then be used immediately.
File Buffer Size and Performance
EDIDocument uses an internal buffer to enable it to quickly create EDI data. It does not put a limit on the size of EDI data that can be created. A limit is imposed by the OS process. The limit is approximately 2 billion characters. Because EDI data can be very large, generating it can consume a lot of memory and effect performance. Speed improvement is attained by specifying an approximate length of the EDI file being created in terms of the amount of characters. The internal buffers will not need to recreate itself with more space if this limit has not been reached. By default the file buffer size is set to 2000 characters. This limit should be change while generating an EDI file larger than 2000 characters (which is most likely the case).
XML File Generation
EDI data can be converted to XML. An example of the XML generated is displayed below. The names of the loop, segment, and element tags can also be customized for smaller XML files.